

Snowflake and Alteryx, making beautiful data
Snowflake is a modern Data Warehouse which was designed from the ground up to leverage the cloud. As a column database, it performs fast for analytical queries and provides the scale needed for larger organisations. One of Our information Lab customers, Simon Sturges, has been using Snowflake with Alteryx and Alteryx Server and shared with us how they set up their connection in Alteryx.
Editor Note: Most of this post is from Simon Sturges, but I have edited some parts to make it more generic.
Pre Requisites
The preferred method for connecting to snowflake is to use anIn-Database (InDB) Connection. This is because the with large volumes of datain the Snowflake tables it makes sense to move the data tables as little aspossible.
If you follow the steps below you will be able to connect toSnowflake locally on your machine, create workflows in Alteryx Designer,publish the workflow to Alteryx Gallery where it can be scheduled to run andalso be shared with other users who can download and or run the workflowmanually in gallery. When the workflow runs it will run using the credentialsconfigured in the indbc file, not the user who may be running it on server.
Initial Setup
To create an InDB connection you will need to complete two one-timesteps. First, make sure you have a Snowflake account and you have the login Snowflakelogin details. Second, make sure you have the drivers installed on yourmachine.
Driver Installation For more information please read the Alteryxsupport documentation.
The Snowflake driver can be downloaded from the Snowflake website here. If you have elevated permissions you can then continue on and install the driver, otherwise, you will need to ask your IT team to install the driver for you.
Create an In Database Connection
To read or write using the Alteryx In-DB connection you willneed to use the Blue In-DB tools by following the below process. This will createan indbc file which is used to connect and authenticate with Snowflake.
- In Alteryx go to Options > Advanced Options > Manage In-DB connections
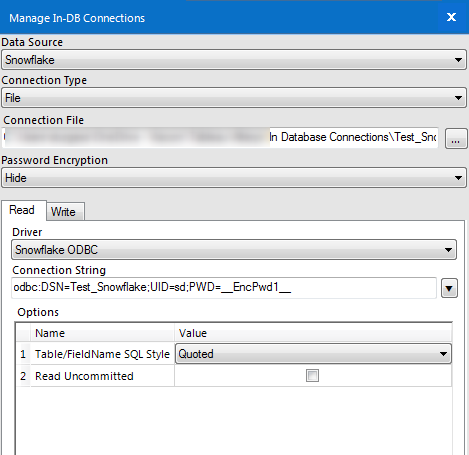
- In the window that opens (see image below) select:
- Datasource = Snowflake
- Connection Type = File
- Connection File = Point to the folder where you store indbc files, enter new file name and open.
- Password Encryption = Hide.
- Read Driver = Snowflake ODBC
- Connection string: Paste the below
odbc:DRIVER={SnowflakeDSIIDriver};UID=<yourSFloginname>;PWD=<YourSFloginpassword>;DATABASE=;SERVER=<Yourserverandregion>.snowflakecomputing.com - replace the <yourSFlonginname>, <YourSFlogninpassword> and <Yourserverandregion> with your details
- Write tab > Driver > Same as read driver
- Select Ok
This setup will allow you to read and write to the snowflake tables without moving the data.
Connecting In-DB
Once the above InitialSetuphas beencompleted, follow the below to read from Snowflake tables.
- Add connect In-DB tool to Alteryx workflow canvas.
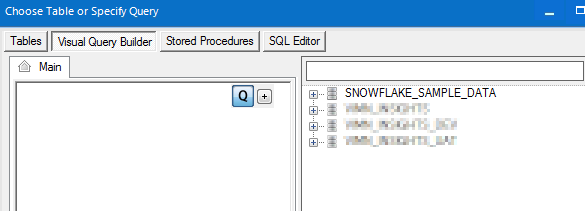
- Select Open File Connection and open the indbc file you’ve just created in part c of the In-Database Connection instructions
- You will now see all the databases you have permission to access in Snowflake. Once connected to the required tables build your workflow as normal
Writing a Table InDB
If you've built your whole workflow using In-Database toolsand you need to write back to a Snowflake table follow the below.
- Add the Write Data In-DB to the canvas
- Output Mode = Create New Table
- Enter 'Database_Name'.'Schema_Name'.'Table_Name'e.g 'SNOWFLAKE_SAMPLE_DATA'.'TPCH_SF10000'.'NEW TABLE'
- Run workflow
- Change Output Mode to match what you want going forward e.g Overwrite Table (Drop) Otherwise the writing will error on the second run as the table already exists
- Carry on.
Standard Connection
If youhave local resources you need to upload or require non InDB tools for someprocesses you will need to upload the records to snowflake. You can use astandard ODBC upload (the same connection string as shown in step 6 of Creating an In Database Connection) but the uploadspeed will be slow. You can use the Snowflake bulk loader to improve the performanceof the upload.
For thebulk loader you will need:
- An S3 bucket (preferably in the same region as your snowflake instance)
- An AWS Access Key
- An AWS Secret Key
- And the Snowflake driver installed (this is the same as earlier)
Create an theSnowflake ODBC DNS
The ODBC DNS connection needs to be named the same as on the server to work properly. Check with your IT team to confirm if a connection exists on the server and what the name of that connection is.
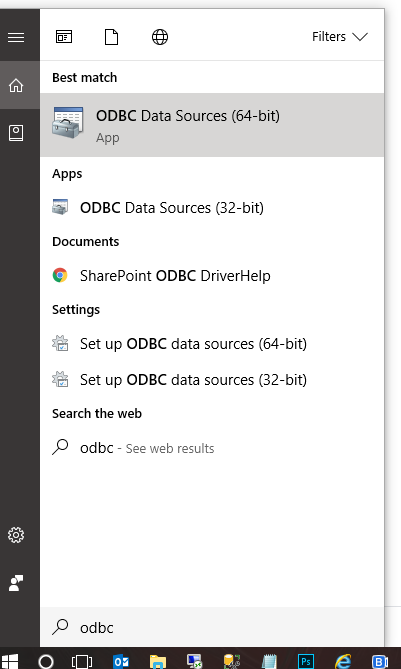
- Open ODBC Datasources (64-bit)
- Select ADD, top right, and then choose the SnowflakeDSIIDriver and then Finish.
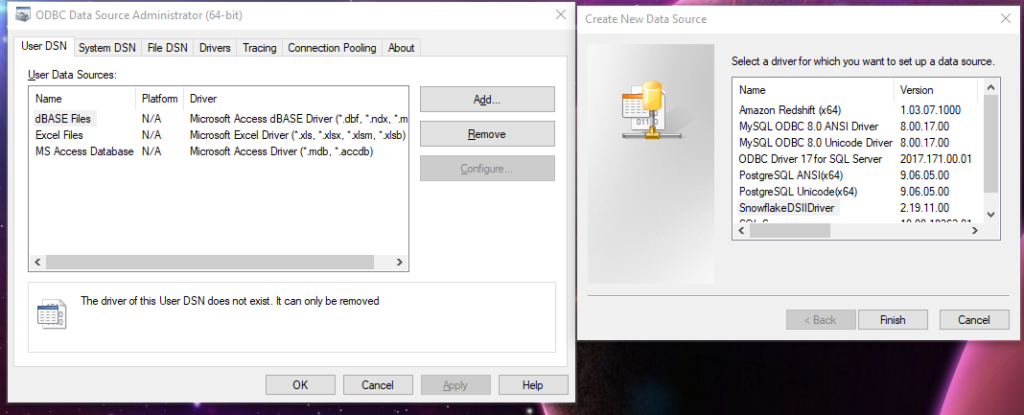
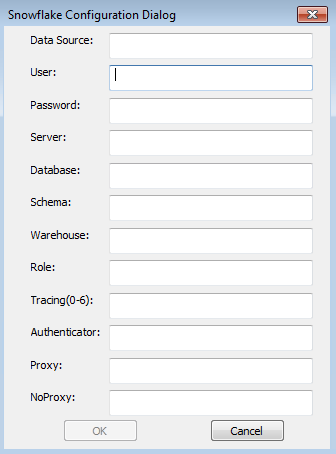
- The following window will appear. Populate the fields
- Datasource: Enter the exact Datasource Name which is on Alteryx Server.
- User: Enter your Snowflake account user name
- Password: Enter your Snowflake password.
- Server: enter yourserver.snowflakecomputing.com (Be sure to remove the https:// from the beginning)
- Database: Leave empty
- Schema: Leave empty
- Warehouse: Leave empty
- All other fields: Leave empty
Bulk Loader using an ODBC Connection
As the bulk loader converts data to CSV anyline breaks in the data will cause the process to fail. To remove line breaksadd a Data Cleansing tool tothe workflow and select the 'Tabs, Line Breaks and DuplicateWhitespace' to remove all line breaks.
Once you're ready to publish to Snowflake take the following steps:
- Add an output tool to the workflow canvas
- Select Datasources > Snowflake > Bulk (this is how it appears in Alteryx Designer 2019.2, it’s different in previous versions)
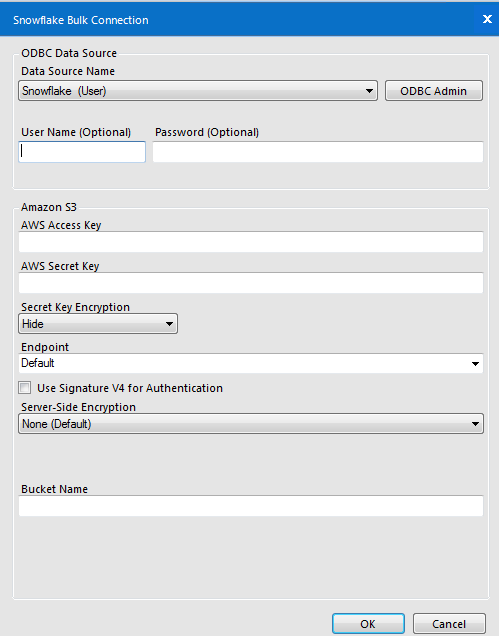
- Datasource Name: Choose Snowflake ODBC DSN created above
- Username: It says this is an optional field but it isn't. Enter your Snowflake user name
- Password: It says this is an optional field but it isn't. Enter your Snowflake password.
- AWS Access Key. Enter your AWS Access Key
- AWS Secret Key Enter your AWS Secret Key
- Secret Key Encryption: Select Hide
- Endpoint: Choose Default. If you have problems with this then choose s3.amazonaws.com
- Use Signature V4 for Authentication: Check this option
- Server-Side Encryption: Leave as None (Default)
- Bucket Name: Enter your S3 Bucket Name
- On the next pop up enter the Snowflake table name you want to create.
- In the Pre Create SQL statement (section 6 of the standard output tool) paste the below syntax. If the warehouse is suspended the workflow will error. This SQL starts the warehouse if it's suspended
ALTER WAREHOUSE 'ENTER WAREHOUSE NAME HERE' RESUME IF SUSPENDED;
USE WAREHOUSE 'ENTER WAREHOUSE NAME HERE';
USE 'ENTER DATABASE NAME HERE'.'ENTER SCHEME NAME HERE';
alter session set client_timestamp_type_mapping=timestamp_ntz
- Run the workflow
- Rerun the workflow and change Output options from Create new table to the relevant option below

Editors Conclusion
Setting up your snowflake connection to work in bothdesigner and when published takes a number of steps. These steps can bereplicated across many different data sources and applications.
If you have gone through this process yourself, either for Snowflakeor for any other database, we would love to hear how you achieved it and what stepsit took for you.
Huge thank you goes out to Simon for sharing your experienceand helping the whole community.