

The Tableau Server REST API is a hugely powerful resource that allows administrators to develop their own applications which automatically perform tasks on an Alteryx Server.
In this blog, I'll detail how (using a 'cheat' method), we can quickly get a authentication token to perform such actions, without re-inventing the wheel.
But, before we start, below are just a few of many usecases that we have seen for interacting with the Tableau Server REST API using Alteryx.
1. Migrating content from one site to another.
2. Batch publishing workbooks
and perhaps the most common...
3. To publish a datasource
So why do we need an authentication token?
For security purposes, the Tableau Server REST API requires users to authenticate your login credentials. This process means that you will only get access to the resources appropriate to your Tableau Server account.
This initial 'sign in' process, returns an authentication token which is valid for 240 minutes (though this can be changed using the Tableau Services Manager (TSM); this token is also only valid for a specific site.
Essentially it offers a short-cut so you don't have to perform this 'sign in' step for every request you wish to make.
So how can I generate an authentication token in Alteryx?
I'm glad you ask, and I can't take much credit for this, it's all thanks to the Alteryx development team.
The first version of the Publish to Tableau Server tool gave users the ability to request an authentication token, rather than publish a datasource to Tableau Server; however, in later version of the tool, this functionality has been removed, Alteryx have their reasons for this, but I won't get into what those are, let's just trust them.
Now, not everyone knows that the initial first version of the tool, has any different functionality to the active version of the Publish to Tableau Server tool, so they won't know this exists!
Downloading and Installing the Tool
So, lets start by downloading the old version of the Publish to Tableau Server Tool, which can be done via the Alteryx Public Gallery.
There are actually three versions available to download, we need version 1, and we need a version which is compatible with your Tableau Server, which is likely to be 'V1.09.2'; from my exploration, it seems the latest version of the tool is now installed in the product by default (very much needed I think, so big up Alteryx on that one).

In order to get the download file, we need to run the analytic app, which will present the user with a download hyperlink; alternatively, if you like shortcuts, the download link is here.
This process will download a '.yxi' file, or Alteryx Installer file; this is a special kind of executable file, which when triggered will unpackage the macro, and automatically place it into the directory...
C:\\Users\\USERNAME\\AppData\\Roaming\\Alteryx\\Tools
This process makes the tool available via the toolbar.
Using the Tool
The tool is available in the 'Developer' tab, but if you love to use the search like me, just searching the terms 'publish' or 'tableau' or of course 'Publish to Tableau Server', will surface the tool.
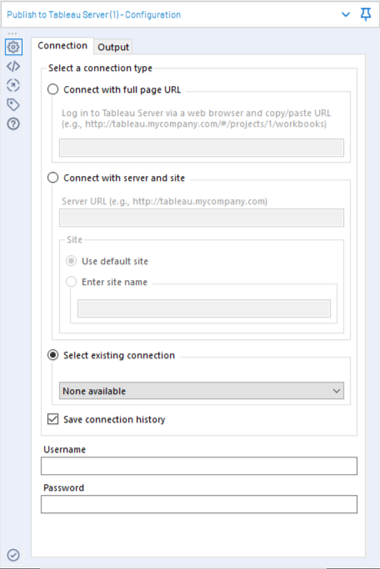
Once you bring it onto the canvas, you will get one of two interfaces, the interface shown in the first image, represents the latest version of the tool...

The interface shown in the second image (below), represents the first version of the tool.
Now, even though we've definitely downloaded the old version of the tool, Alteryx has been clever, and by default (providing you have it, which you will in version 2019.1 and onwards), it will present the user with the latest version of the tool.
However, we can downgrade the tool version, by right clicking on the tool and hitting the 'change tool version' option.
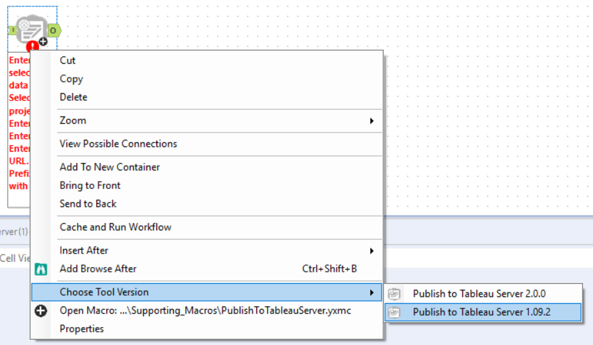
This process will downgrade the tool on your canvas, and the configuration pane will revert to the first version of the tool.
So, now we have the right tool on the canvas, lets get our authentication token.
In order to use the Publish to Tableau Server tool, we must have an input; I just use a text input with a single column and row, it really doesn't matter.
On the tool itself, you should configure the connection settings as appropriate.
On the second tab (and this is where the magic is), there is the option 'Request Authentication Token', which, unsurprisingly, will generate an authentication token.
The image below highlights the option that we need to select in red; the image also highlights, in green, the authentication token, given in the field 'X-Tableau-Auth'.
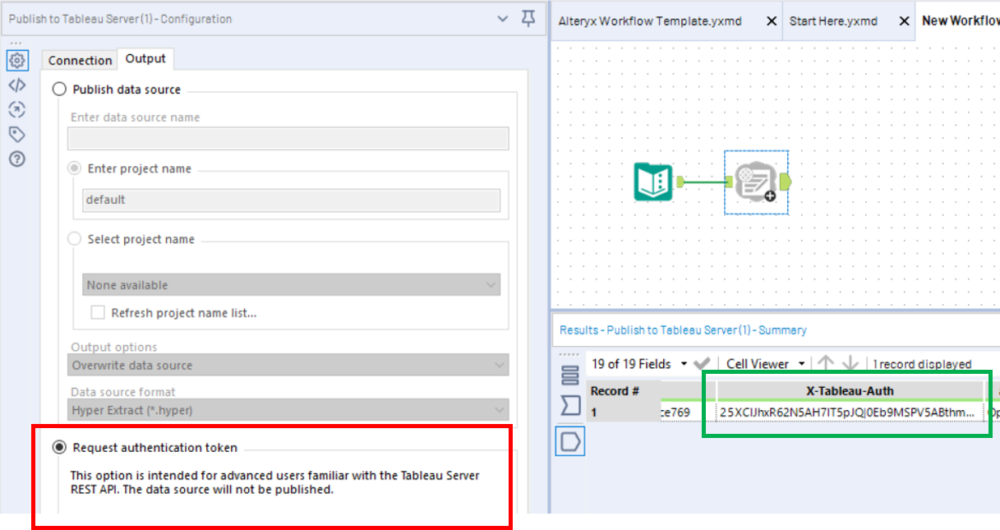
Now whilst that output header name may seem a tad random, it's actually extremely useful, as you will discover when making any subsequent calls, the 'X-Tableau-Auth' is the header name for the authentication token, so when we use the download tool to make subsequent calls, we can simply check this field as a header option.
I've wrote this blog because I feel that those new to the tool will not realise this behaviour existed; and I've experienced first hand, people reinventing the wheel, simply because they didn't know the tool existed at all.
Ben